Wednesday 24 July 2013

Add Meta Tags in Blogger for SEO Optimization - Step by Step Free Training (Class-5)

What are Meta Tags
To see your blogger pages links google or any other search engine results you must add meta tags to your blogger.
This is a little tricky but i will try to explain in very simple way and with pictures so that you can easily follow and understand the process of adding meta tags in your blogger.

Types of Meta Tags
There are three main types of meta tags
  1. title
  2. description
  3. keywords 
How to Create Meta Tags
All meta tags have two portions one is name and other is content  name is used to tell the type of meta tag and content is used to tell search engine about your page.
 
As I told that meta tags help search engines to discriminate and evaluate web pages to what topic they belongs to. For example if we have created a page about biography of Hazrat Muhammad (Peace Be Upon Him). We create following meta tags to tell search engine about our page.
<meta name="title" content="Biography of Hazrat Muhammad (Peace Be Upon Him)">


<meta name="description" content="Prophet Muhammad SAW was born in Makkah, around 570 C.E. He is the model for humanity for all walks of life to follow until the Last Hour. God sent him as a mercy for the worlds.">


<meta name="keywords" content="Life of Hazrat Muhammad, Muhammad, biography of Hazrat Muhammad, history of Hazrat Muhammad">

Step 1.
Go to your dashboard and click on template.
Then click on Edit HTML. 


Step 2.
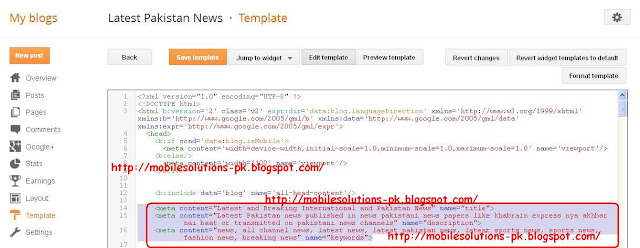
Find the string (b:include data="blog" name="all-head-content") as shown in yellow outline.
Write below this string you have to add meta tags.
First add title tag.
<meta content="here write title of your blog" name="title" />


Step 3.
Now add description meta tag. Description is explanation of your contents in 3 to 4 lines.


Step 4.
Now add kewords meta tag and in ncontent section write keywords related to the topic of  your blog. 


Q Mobile Low internal Memory Solution of Noir A2

Using this trick you can increase internal memory of your Q Mobile Noir A2. QMobile noir

A2 is a very good cellphone with
a reasonable price that's why it has low memory of just 232 MB. Most of the RAM is being used by Operating system, letting
very less amount of shared memory for other apps. After installing some apps we actually
 get upto 90 mb to download and install on the internal memory . Some apps do not install on the memory card
(sd card) like Google services, whatsapp etc. Using This trick all downloaded apps can be moved
to Memory Card without rooting Q Mobile.

Follow these steps >>> "This Mod Is Based On CM7"

1. Download And Extract the app by clicking on download.

2. Open The Extracted Folder U Will See It Has 2 APK Files These are    actually The Mod Files
3. Copy Extracted File To Ur Memory Card
4. Now On Your Phone Head To Your Settings And In The The Applications Menu Tick The Unknown Sources Box
5. Install The Apps In In The Number Sequence
6. Once You Have Installed Both Of The Apps Go To Your Setting Files Again
7. Now When You Open Ur Setting Apps The Whole Menu Will Look Like The CM7 Setting Menu
8. In Here Open The CyanogenMod Settings
9. On The Top There Will Be A Application Menu Open That Now
10. In The Menu Locate The Install Location And Open It
11. There Will Be 3 Option Automatic , Internal , External
12. Your Phone By Default Would Be On Automatic Change That And Select External
13. Once You Have Done This Exit Ur Setting App And Restart Or Reboot Ur Phone
14. After Rebooting Again Head To Ur Setting App And Open It

Tuesday 23 July 2013

How to Change Layout of Blog - Step by Step Free Training (Class-4)

Themes provide background and color settings of the website. To display contents of the website in organized and good looking way we create a layout of the website.
In previous class we have changed the theme of the blogger. In this class I will tell you how to change layout of your blog.
Normally standard layout is main header on top; then main menu.
below main menu page is divided in three parts navigation, contents and latest items.
At the last footer comes, where copyrights information and owners links are displayed.
Basic Layout is displayed in picture below.
Keeping in view the basic layout we will select blogger layout.


Step 1.
Click on the layout in blogger dashboard.

Step 1.
Click on the Layout in template designer..

Step 2.
Here you can select different layouts of body and footer. Select 3 column layout as shown in red box and apply.


Step 3.
You will see preview right below in the page as shown below in picture. Apply to the blog. Now you have created the layout of the blog. Ask me if you have any kind of question in your mind.


Monday 22 July 2013

How to Change Theme in Blog - Step by Step Free Training With Pictures (Class-3)

Today I will tell you how to change theme in Blogger. Themes are the basic presentation styles you want to display contents on your website. Theme should be related to your topic of the website and type and quantity of contents you want to display.
In our Example we are creating News Website so we will choose theme according to it.

 Step 1.
Select Theme from dashboard.
Select Customize right below the preview of the theme.


 Step 2.
Customization page have two parts. From the top you can select theme and below preview of your selected theme will be shown.


 Step 3.
Select Theme of your choice.

 Step 4.
Click on Apply to Blog when finished.

 Step 5.
On successful completion of theme changing blogger will display message as shown below..


Sunday 21 July 2013

How to Create Post in Blog - Step by Step Free Training with Pictures

In previous Post You have learned how to create a blog. Today I will show you how to create a post in Blog

Step 1.
To create a post click on New Post


Step 2.
Enter Post title as show in picture.
Enter your post contents in box for contents.


Step 3.

Enter labels for your post. Labels are used to organize posts of different topics. Separate labels using commas. We will use these labels to create the structure of a drop down menu and in this way we will give a professional look to blog.
Here I try to explain the Idea
Suppose you are building a sports website and your main menu will contain items as shown below.
 Then you will create 4 labels
  1. matches schedule
  2. scores
  3. grounds history
  4. sportsmen biography
Now if your post is related to cricket scores you will create another label cricket scores and assign these tow labels to your post. See picture for details.

Step 4.
Press Done and then Publish. 
Next i will tell you how to manage a blog. Please Comment.


How to Create a Blog - Step by Step Free Training with Pictures

Blogger is the best choice for beginners who want to create a simple website for personal or commercial use.
Website created with blogger be on top ranking right from the first day of creating it. It is the most SEO optimised CMS (Content Management System), Wordpress is No.2.

Today I will Start from the First step..........
                                  Click on Images to Enlarge  
Step No 1. 
Go to Address bar and type blogger address.
 
Step No 2. 
Login using your Google account or signup for new one.


Step No 3. 
Confirm you account information and clic on Continue to Blogger.

Step No 4. 
Click on New blog as Shown.


 Step No 5. 
  1. Enter your Blog Title. It will be shown on title bar of the browser and in the header of your blog.
  2. Enter your blogs unique Address just like (http://mobilesolutions-pk.blogspot.com).
  3. Chose Template for your Blog.
Step No 6. 
Click on Start Blogging.


Step No 7. 
Thats it You Have Created your Blog. Click on View Blog to view your Blog.


Recommended Post