Tuesday, 20 August 2013

How to Hard Reset Qmobile A2, A5, A10 Video Tutorial in Urdu

If you are facing errors in your Android Q Mobile and applications are misbehaving, there may be some setting problem in the operating system of your mobile.An easy Mobile Solution for this kind of problem is to hard reset your Q Mobile. This process is vaid for all Android Q Mobiles including Noir A2, Noir A8, A6, A10, A12, A50, A500, A600 and others.
Hard resetting your Q Mobile is very easy. Watch Video Tutorial 

Wednesday, 14 August 2013

Qmobile Noir A20 Price and Specifications


Qmobile announced first Quad Core processor smartphone Qmobile Noir A20 with 1.2 Ghz processor, Qmobile Noir A20 comes with 1GB RAM and 4GB built-in memory (1.70 user available), Qmobile Noir A20 runs on Android jelly bean 4.1 OS and allows users to enjoy hundred of apps, Qmobile Noir A20 comes with WiFi connectivitiy and allows users to browse internet & use Facebook, Google Talk and much more. 
Details Specs
Dimension 136.5 x 67 mm 
Weight N/A
Battery Talk time Up to 5 h , Stand-by Up to 400 h
OS Android OS, v4.1 Jelly bean
Memory  4GB built-in + 8GB card included in box, 1GB RAM, microSD card(supports up to 32GB)
Processor Quad-core 1.2 GHz, ARMv7 Chipset, GPU (PowerVR SGX)
Connectivity Bluetooth v4.0 with A2DP, USB, WLAN (Wi-Fi 802.11, b/g/n), GPRS Class, EDGE
Display Size 4.5 inches, 540 x 960
Sensors: Accelerometer, Proximity, Light sensor, Magnetic field sensor, Gyroscope sensor, Gravity sensor
Display Colour QHD LCD Capacitive touchscreen, 16M colors (240 dpi), Multitouch
Operating Frequency / Band SIM 1: 900/1800/1900
SIM 2: 900/1800/1900 
Browser HTML5
Colors Black
Entertainment  FM Radio, 3.5mm audio jack, MP4/WMV/H.264/H.263 player, MP3 player, Google Talk, Games (built-in + downloadable)
Camera  8MP, 3264 x 2448 pixels, autofocus, LED flash, Panorama, Video, Video recording 1920 x 1080 (Full HD), 2ndary  
Other Features Dual SIM, GPS + A-GPS support, Google Search, Maps, Gmail, Youtube, Calendar, Speakerphone
Ring Tones Downlaodable, Polyphonic, MP3, WAV 
Messaging  SMS(threaded view), MMS, Email, Push Mail, IM
Price Price in Rs: 19,000    Price in USD: $196 

Sunday, 11 August 2013

How to Unroot QMobile Noir A10, A2, A5, A500, A600, A950

Unrooting your Android Qmobile is not very tricky. You can un-root your Qmobile A2, A5, A10, A500, A600, A950 etc. To unroot your mobile just follow these simple steps.
  1. Download and extract this zip file: Root_script_by_Bin4ry_v17.Zip
  2. Enable USB debugging on your Noir a10. (Go to Settings > Developer Options >  Check mark “USB Debugging” and then tap OK button.
  3. Now connect your Qmobile Noir A10 to your computer via USB cable. The drivers should be installed automatically or use official Qmobile drivers. (You can also use Pdanet to install drivers)
  4.  Go to the folder named “Root_script_by_Bin4ry_v17″ and run the “Runme.bat” file. This should open the command prompt.
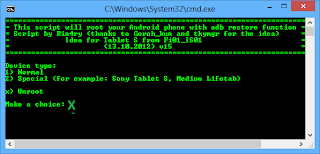
  5.  Choose the Normal mode by typing ‘X‘ and hit Enter button from your keyboard.
    Follow the on-screen instructions to complete the Qmobile a10 un-rooting process. Your Noir A10 will reboot during the process after which Bin4ry will copy some files to your device. 
  6. When your phone is back ON, you should find the superuser SU app in your app drawer. If it’s there, your Noir QMobile has been un-rooted!

How to Root QMobile Noir A10, A2, A5, A500, A600, A950

Rooting your Android Qmobile is not very tricky. You can root your Qmobile A2, A5, A10, A500, A600, A950 etc. To root your mobile just follow these simple steps.
  1. Download and extract this zip file: Root_script_by_Bin4ry_v17.Zip
  2. Enable USB debugging on your Noir a10. (Go to Settings > Developer Options >  Check mark “USB Debugging” and then tap OK button.
  3. Now connect your Qmobile Noir A10 to your computer via USB cable. The drivers should be installed automatically or use official Qmobile drivers. (You can also use Pdanet to install drivers)
  4.  Go to the folder named “Root_script_by_Bin4ry_v17″ and run the “Runme.bat” file. This should open the command prompt.
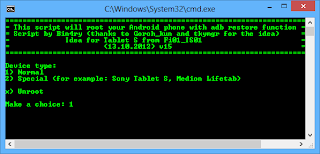
  5.  Choose the Normal mode by typing ‘1‘ and hit Enter button from your keyboard.
    Follow the on-screen instructions to complete the Qmobile a10 rooting process. Your Noir A10 will reboot during the process after which Bin4ry will copy some files to your device. 
  6. When your phone is back ON, you should find the superuser SU app in your app drawer. If it’s there, your QMobile Noir A10 has been rooted!

You can now customize your qmobile a10 the way you want. You can also install custom launchers. If you ever run out of internal memory, you can always use Link2SD with microSD card.


Friday, 9 August 2013

Qmobile Noir A600 Price and Specifications


Qmobile Noir A600 is smart phone having 5 inches wide IPS LCD capacitive touchscreen HD display, The Qmobile Noir A600 is powered by Quad Core processor which ensures a smoother & fast performance with Android OS, v4.1.2 (Jelly Bean), For photo shot lovers Qmobile Noir A600 houses an 8MP camera with Auto focus & front camera for video calling, For connectivity, the Qmobile Noir A600 features 3G, GPS, Wi-Fi & Bluetooth.


Dimension 144 x 74 x 10.7 mm 
Weight 156 g
Battery Talk time Up to 5 h, Stand-by Up to 174 h 
OS Android 4.1.2, Jelly Bean
Memory  4GB built-in + 8GB microSD card included, 1 GB RAM, microSD card (supports up to 32GB)
Processor 1.2 Ghz Quad Core Cortex-A7, MTK MT6589 Chipset, GPU
Connectivity Bluetooth, USB, WLAN (Wi-Fi 802.11 b/g/n, Wi-Fi hotspot), GPRS Class 12, EDGE Class 12, 3G 
Display Size 720 x 1280 pixels, 5.0 inches,
Sensors: Accelerometer, gyro, proximity 
Display Colour IPS LCD capacitive touchscreen, 16M colors, Multitouch
Operating Frequency / Band SIM 1: 850 / 900 / 1800 / 1900
SIM 2: 850 / 900 / 1800 / 1900 
Browser HTML5
Colors Black, White
Entertainment  FM Radio, 3.5mm audio jack, MP4/WMV/H.264/H.263 player, MP3/AAC/WMA/WAV player, SNS integration, Google Talk, Games (built-in + downloadable) 
Camera  8MP, 3264 x 2448 pixels, autofocus, Dual-LED flash, Geo-tagging, touch focus, face detection, Video, 2ndary (2MP) 
Other Features Dual SIM, GPS + A-GPS support, MicroSIM card support only, Google Search, Maps, Gmail, Youtube, Calendar, Speakerphone 
Ring Tones Downlaodable, Polyphonic, MP3, WAV 
Messaging  SMS(threaded view), MMS, Email, Push Mail, IM 
Price Price in Rs: 20,999    Price in USD: $216 

Thursday, 8 August 2013

Qmobile Noir A700 Price and Specifications


Qmobile Noir A700 smartphone come with 5.3 inches wide qHD IPS touchscreen with 540 x 960 pixels display, The Qmobile Noir A700 is powered by Quad core processor which ensures a smoother & snappier performance with Android OS, v4.1 Jelly bean, For photo shot lovers Qmobile Noir A700 comes with 8MP HD camera with Auto focus and LED flash & front camera for video calling, For connectivity, the Qmobile Noir A700 is featuring 3G, GPS, Wi-Fi and Bluetooth, and will be available in black color.


Dimension 153 x 77.5 x 10.3mm 
Weight N/A
Battery N/A
OS Android OS, v4.1 Jelly bean
Memory  4GB built-in + 8GB microSD card included, 1 GB RAM, microSD card (supports up to 32GB)
Processor Quad core 1.2 GHz, Cortex A7, GPU
Connectivity Bluetooth v4.0, with A2DP, USB, WLAN (Wi-Fi 802.11 Wi-Fi hotspot), GPRS Class 12, EDGE Class 12, 3G
Display Size 540 x 960 pixels, 5.3 inches,
Sensors: Proximity sensor, G-sensor, E-Compass
Display Colour qHD IPS touchscreen, 16M colors, Multitouch
Operating Frequency / Band SIM 1: 850 / 900 / 1800 / 1900
SIM 2: 850 / 900 / 1800 / 1900
Browser HTML5
Colors White, Graphite Black
Entertainment  FM Radio, 3.5mm audio jack, MP4/WMV/H.264/H.263 player, MP3/AAC/WMA/WAV player, SNS integration, Google Talk, Games (built-in + downloadable)
Camera  8MP, AF, autofocus, Dual-LED flash, Geo-tagging, touch focus, face detection, Video, FHD video recording (Rear Camera), 2ndary (1MP) 
Other Features Dual SIM, GPS + A-GPS support, MicroSIM card support only, Face Unlock, Google Search, Maps, Gmail, Youtube, Calendar, Speakerphone 
Ring Tones Downlaodable, Polyphonic, MP3, WAV
Messaging  SMS(threaded view), MMS, Email, Push Mail, IM
Price Price in Rs: 22,900    Price in USD: $236

Qmobile Noir A950 Price and Specifications


Qmobile Noir A950 equips 4.65 inches of amazing HD Super AMOLED, and makes this the most distinct and clear display, Qmobile Noir A950 comes with Quad Core 1.2 GHz Super Processor for high performance using Cortex A7, Qmobile Noir A950 comes with 8MP camera haivng 720p HD video recording and a front camera for video calling, Qmobile Noir A950 runs of Android OS v4.1 Jelly Bean that offers more than thousands of apps to enrich your life.
Dimension 123 x 63.5 x 11.2 mm
Weight N/A
Battery Talk time Up to 7 h, Stand-by Up to 450 h
OS Android OS, v4.1 Jelly bean
Memory  4 GB built-in + 8GB microSD card included, 1 GB RAM, microSD card (supports up to 32GB)
Processor Quad Core 1.2GHz, Cortex A7 Chipset
Connectivity Bluetooth, USB, WLAN (Wi-Fi 802.11 b/g/n, Wi-Fi hotspot), GPRS Class 12, EDGE Class 12, 3G
Display Size P720 x 1280 pixels, 4.65 inches,
Sensors: G-sensor, Light Sensor, Compass 
Display Colour Super AMOLED LCD Plus touchscreen, 16M colors, Multitouch
Operating Frequency / Band SIM 1: 850 / 900 / 1800 / 1900
SIM 2: 850 / 900 / 1800 / 1900
Browser HTML5
Colors Black
Entertainment  3.5mm audio jack, MP4/WMV/H.264/H.263 player, MP3/AAC/WMA/WAV player, SNS integration, Google Talk, Games (built-in + downloadable)
Camera  8MP, autofocus, LED flash, Geo-tagging, touch focus, face detection, Video, 2ndary (1MP)
Other Features Dual SIM, GPS + A-GPS support, MicroSIM card support only, Google Search, Maps, Gmail, Youtube, Calendar, Speakerphone
Ring Tones Downlaodable, Polyphonic, MP3, WAV
Messaging  SMS(threaded view), MMS, Email, Push Mail, IM
Price Price in Rs: 26,500    Price in USD: $273

Q Mobile A2, A5, A10 Hard Reset Solution

If you are facing errors in your Android Q Mobile and applications are misbehaving, there may be some setting problem in the operating system of your mobile.An easy Mobile Solution for this kind of problem is to hard reset your Q Mobile. This process is vaid for all Android Q Mobiles including Noir A2, Noir A8, A6, A10, A12, A50, A500, A600 and others.
Hard resetting your Q Mobile is very easy. Just follow below steps.
  1. Turn Off your mobile.
  2. Now you have to press 3 keys at the same time
    Volume Up
    Volume Down
    Power
  3. Now on screen two options will be displayed
  4. Recovery Mode and Factory Mode
  5. Volume up key is used for recovery mode and Volume down key is use for factory mode. Here you have to select recovery mode by pressing Volume up key.
  6. On next screen various options will be displayed. Here you have to select Wipe Data/Factory reset by using second touch button from left side.
  7. On next screen set will get confirmation from user to confirm wiping all data and warn that this selection can not be reverted. So as you are resetting your mobile select 8th option Yes-Delete all user data.
  8. The mobile will now start wiping data and factory reset and information will be displayed on your screen, showing wiping data and displaying running processes.
  9. Just sit back and watch and note if system displays an error or not, if yes write down that error for future use.
  10. After reset when you will reboot your Q mobile it will be as unpacked and started first time.

Thursday, 1 August 2013

Add Custom Theme to Blogger - Upload Blogger Template - Free Step by Step Training With Pictures (Class-7)

Blogger can be customized and you can upload your own choice template in blogger. Adding template to blogger, however , is not similar to other types of uploads. To add custom templates in blogger website download your choice of blogger template from any free blogger templates website.
A blogger template consists of .xml file. You have to copy and paste all contents of template.xml file with existing template an edit html mode. Let me explain you in steps, how to upload blogger templates.

Creating Backup o Bloger Template
To create backup of blogger template click on template in dashboard.
Clck on Edit HTML.
Wen HTML EDITOR is opened click anywhere in html of template and select any one or two words. Press CTRL+A and select all. Now create a text file in your computer and aste all contents of your blogger template html.
Rename it to the name of your blogger and save in your PC.

Uploading Blogger Template
Now open downloaded template's xml file and select all by pressing CTRL+A.
Press CTRL+C to copy all contents of template.
Noe go to your blogger template editor and select all by presing CTRL+A.
Press delete.
Press CTRL+V.
Save template

Click on view blog and see the changes. All Website shoulb be in new look according to your uploaded template.


"Images of this class will be uploaded soon"

Wednesday, 31 July 2013

Zong Free Intermet Settings for Q Mobile Android Mobiles

ZONG Internet Settings for Android Mobiles are posted here. Keep these settings for free internet on your Q mobile Android Mobiles, and enjoy.
1. Go to Settings > Wireless & networks > Mobile networks >Access Point Names.
2. Press the ‘Menu’ key and select “New APN”.
3. Now use the following settings:
Name: Zonginternet (anything you like)
APN: zonginternet
Proxy: (leave Blank)
Port: (leave Blank)
Username: (leave Blank)
Password: (leave Blank)
Server: (leave Blank)
MMSC: (leave Blank)
MMS proxy: (leave Blank)
MMS port: (leave Blank)
MCC: 410 (should be there by default)
MNC: 04 (use whatever is there by default)
Authentication type: None
APN type: default,supl
APN protocol: IPv4

ZONG WAP Settings for Android Mobiles
1. Go to Settings > Wireless & networks > Mobile networks >Access Point Names.
2. Press the ‘Menu’ key and select “New APN”.
3: Now use the following settings:
Name: Zongwap
APN: zongwap
Proxy: 10.81.6.33
Port: 8000
Username: (leave Blank)
Password: (leave Blank)
Server: (leave Blank)
MMSC: (leave Blank)
MMS proxy: (leave Blank)
MMS port: (leave Blank)
MCC: 410 (should be there by default)
MNC: 04 (use whatever is there by default)
Authentication type: None
APN type: default,supl
APN protocol: IPv4

ZONG MMS Settings for Android Mobiles
1. Go to Settings > Wireless & networks > Mobile networks >Access Point Names.
2. Press the ‘Menu’ key and select “New APN”.
3. Now use the following settings:
Name: Zongmms
APN: zongmms
Proxy: (leave Blank)
Port: (leave Blank)
Username: (leave Blank)
Password: (leave Blank)
Server: (leave Blank)
MMSC: http :// 10.81.6.11:8080
MMS proxy: 10.81.6.33
MMS port: 8000
MCC: 410 (should be there by default)
MNC: 04 (use whatever is there by default)
Authentication type: None
APN type: mms
APN protocol: IPv4

Zong Free Internet

Today I will tell you the free internet settings for your mobile. You can also use these settings for your QMobiles and can enjoy free internet on your Q Mobiles. In other post I have posted Free internet settings for ufone, jazz, and telenor. If any query comment please


For s40
\menu > settings > configuration settings > personal configuration settings > Add new > Web.
Account Name: Web
Homepage: wap.zong.com.pk
Username: Blank
Password: Blank
Use preferred access point: No
Access point Settings,
Proxy : Disabled
Data bearer: Packet Data
Bearer settings,
Packet data access point: press 0 three times then write 10.81.6.33
Authentication: Normal
Username: Blank
Password: Blank
Now save the settings and go back and activate these settings as default, then connect the net, make sure your balance are zero........

For s60,
1.Download & Install QuickWrite 2.20 from http://www.getjar.com/products/5475/...riteS60English , key is 39598-50704
2.Launch QuickWrite and Activate Text Engine 'QuickWrite'.
3.Go to Web Browser(Services) > Settings > Options > Change > Options > Edit > Access Point Name > Change.
3.Press * or press 0 three times the cursor will go on the next line, then write 10.81.6.33 or ;
3.Press OK & save the settings, go back & start browsing...Enjoy...make sure your balnce are zero...

For s60v3,
1.download QuickWrite from this given link http://www.sharemobile.ro/file.php?id=350640 key is 39598-50704
2. folloow the same steps of s60....
3.enjoy free internet. Agar balance zero nahi ho ga to wo khatam ho jaye ga.

Pehlay yah tricks seperate theen aab inko combile kar diya ha
Plz reply must.


Quick Write 4 s60 v3 mobiles.
http://www.filefactory.com/file/ah49..._50_signed_sis
http://www.filefactory.com/file/ah49...ged-BiNPDA_sis - See more at: http://www.tafreehmella.com/threads/101-working-promise-zong-ufone-net-free-full-method.210668/#sthash.WZOR1guK.dpuf

Tuesday, 30 July 2013

Q Mobile Secret Codes

This post is about  Q Mobile E900 Secret Codes,Q Mobile E950 Secret Codes, Q Mobile E990 Secret Codes; I have given secret codes for mobiles.These secret codes are 100% tested but Please tell me if codes are not working on your Mobile.

Q mobile all models test mode: Type 2945#*# on the main screen.
2945*#01*# Secret menu for LG

IMEI (ALL): *#06#
IMEI and SW (Q mobile 510): *#07#
Software version (Q mobile B1200): *8375#
Recount cheksum (Q mobile B1200): *6861#
Factory test (B1200): #PWR 668
Simlock menu (Q mobile B1200): 1945#*5101#
Simlock menu (Q mobile 510W, 5200): 2945#*5101#
Simlock menu (Q mobile 7020, 7010): 2945#*70001#
Simlock menu (Q mobile 500, 600): 2947#*

Qmobile-U81XX SPECIAL CODES
Code to read phone version :
- Phone without SIM
- Enter 277634#*# or 47328545454#
- Select 'SW Ver.info'
Code to reset phone :
- Phone without SIM
- Enter 277634#*# or 47328545454#
- Select 'Factory Reset'
Code to enter UNLOCK MENU :
- Phone wit SIM inside
- Enter 2945#*88110#
Test Menu 8330 : 637664#*#
Test Menu 8110-8120: 277634#*#
Test Menu 8180 V10a: 49857465454#
Test Menu 8180 V11a: 492662464663#
Test Menu 8130-8138: 47328545454#

Ufone Free Internet for QMobile E200

Ufone Free Internet can be used on Q Mobile E200. To use free internet on your mobile you have to change your current settings to free internet settings. These free internet settings are for  Qmobile but can also be used on all mobile for free internet.
To configure your set for free internet settings first of all go to data accounts.
Create New account in GPRS.
Write ufone.pmms in APN Settings.
After that you will see different options fr settings.
Set your connection name to Ufone.
Set your homepage to m.google.com.pk
 Set account type to HTTP.
Set IP Address to Free IP Address for ufone internet.
 172.016.013.026
Set Port number to 8080.

Now save this free settings account for ufone.
Activate it for all applications and Enjoy.


Like US on Facebook Page. and comment also.........
If IP address is not working Please tell me I will provide you alternate.


Sunday, 28 July 2013

Add Unique Descriptions to your Blog Posts - Step by Step Free Blogger Training (Class-6)

In previous class we added meta tags in blogger template. Those tags will be same for all posts of the blog. We can add unique meta tags for all posts, It means that all posts of the blog will have its own unique meta description according to the topic of the post. To do this first of all we have to restrict our homepage description tag to homepage only.
It is very simple, I will explain you how to add blogger homepage meta tags that will be displayed only i homepage. And then we will add unique meta descriptions for every post.
 Fortunately google provdes now built in tool to add meta descriptions.
First of Click on settings on dashboard and then on Search preferences.
 In search preferencesClick on description and check radio button Enable search description to yes.
Once you enable the search enable a text box will be shown. Here you enter your blogger description of homepage. Wen done click on save changes.

Now you have enter description of your blogger and it will be displayed only on homepage. To add unique description to your post click on new post or edit post for existing one.
When you enter in post editor, on right side you will see an option Search Description, Click on it and a text box will be shown. Enter unique description of your post probably the first paragraph of your post containing main and supporting keywords.

So in this way you can add unique description tags to your posts for better SEO ranking. If you like my work or dislike please tell me by your comments. Thanks

Wednesday, 24 July 2013

Add Meta Tags in Blogger for SEO Optimization - Step by Step Free Training (Class-5)

What are Meta Tags
To see your blogger pages links google or any other search engine results you must add meta tags to your blogger.
This is a little tricky but i will try to explain in very simple way and with pictures so that you can easily follow and understand the process of adding meta tags in your blogger.

Types of Meta Tags
There are three main types of meta tags
  1. title
  2. description
  3. keywords 
How to Create Meta Tags
All meta tags have two portions one is name and other is content  name is used to tell the type of meta tag and content is used to tell search engine about your page.
 
As I told that meta tags help search engines to discriminate and evaluate web pages to what topic they belongs to. For example if we have created a page about biography of Hazrat Muhammad (Peace Be Upon Him). We create following meta tags to tell search engine about our page.
<meta name="title" content="Biography of Hazrat Muhammad (Peace Be Upon Him)">


<meta name="description" content="Prophet Muhammad SAW was born in Makkah, around 570 C.E. He is the model for humanity for all walks of life to follow until the Last Hour. God sent him as a mercy for the worlds.">


<meta name="keywords" content="Life of Hazrat Muhammad, Muhammad, biography of Hazrat Muhammad, history of Hazrat Muhammad">

Step 1.
Go to your dashboard and click on template.
Then click on Edit HTML. 


Step 2.
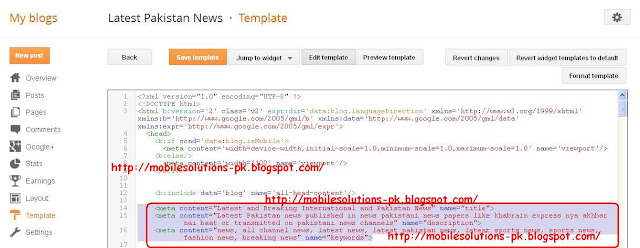
Find the string (b:include data="blog" name="all-head-content") as shown in yellow outline.
Write below this string you have to add meta tags.
First add title tag.
<meta content="here write title of your blog" name="title" />


Step 3.
Now add description meta tag. Description is explanation of your contents in 3 to 4 lines.


Step 4.
Now add kewords meta tag and in ncontent section write keywords related to the topic of  your blog. 


Q Mobile Low internal Memory Solution of Noir A2

Using this trick you can increase internal memory of your Q Mobile Noir A2. QMobile noir

A2 is a very good cellphone with
a reasonable price that's why it has low memory of just 232 MB. Most of the RAM is being used by Operating system, letting
very less amount of shared memory for other apps. After installing some apps we actually
 get upto 90 mb to download and install on the internal memory . Some apps do not install on the memory card
(sd card) like Google services, whatsapp etc. Using This trick all downloaded apps can be moved
to Memory Card without rooting Q Mobile.

Follow these steps >>> "This Mod Is Based On CM7"

1. Download And Extract the app by clicking on download.

2. Open The Extracted Folder U Will See It Has 2 APK Files These are    actually The Mod Files
3. Copy Extracted File To Ur Memory Card
4. Now On Your Phone Head To Your Settings And In The The Applications Menu Tick The Unknown Sources Box
5. Install The Apps In In The Number Sequence
6. Once You Have Installed Both Of The Apps Go To Your Setting Files Again
7. Now When You Open Ur Setting Apps The Whole Menu Will Look Like The CM7 Setting Menu
8. In Here Open The CyanogenMod Settings
9. On The Top There Will Be A Application Menu Open That Now
10. In The Menu Locate The Install Location And Open It
11. There Will Be 3 Option Automatic , Internal , External
12. Your Phone By Default Would Be On Automatic Change That And Select External
13. Once You Have Done This Exit Ur Setting App And Restart Or Reboot Ur Phone
14. After Rebooting Again Head To Ur Setting App And Open It

Tuesday, 23 July 2013

How to Change Layout of Blog - Step by Step Free Training (Class-4)

Themes provide background and color settings of the website. To display contents of the website in organized and good looking way we create a layout of the website.
In previous class we have changed the theme of the blogger. In this class I will tell you how to change layout of your blog.
Normally standard layout is main header on top; then main menu.
below main menu page is divided in three parts navigation, contents and latest items.
At the last footer comes, where copyrights information and owners links are displayed.
Basic Layout is displayed in picture below.
Keeping in view the basic layout we will select blogger layout.


Step 1.
Click on the layout in blogger dashboard.

Step 1.
Click on the Layout in template designer..

Step 2.
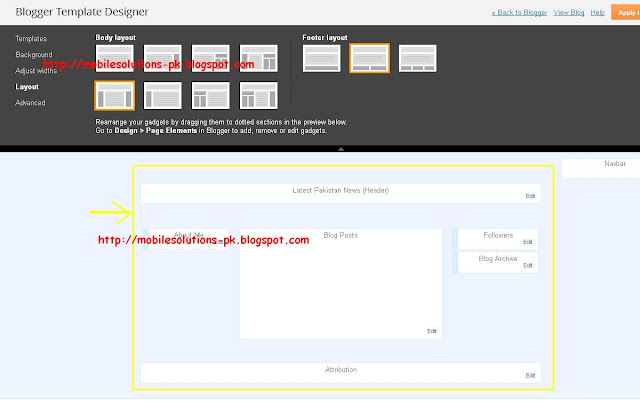
Here you can select different layouts of body and footer. Select 3 column layout as shown in red box and apply.


Step 3.
You will see preview right below in the page as shown below in picture. Apply to the blog. Now you have created the layout of the blog. Ask me if you have any kind of question in your mind.


Monday, 22 July 2013

How to Change Theme in Blog - Step by Step Free Training With Pictures (Class-3)

Today I will tell you how to change theme in Blogger. Themes are the basic presentation styles you want to display contents on your website. Theme should be related to your topic of the website and type and quantity of contents you want to display.
In our Example we are creating News Website so we will choose theme according to it.

 Step 1.
Select Theme from dashboard.
Select Customize right below the preview of the theme.


 Step 2.
Customization page have two parts. From the top you can select theme and below preview of your selected theme will be shown.


 Step 3.
Select Theme of your choice.

 Step 4.
Click on Apply to Blog when finished.

 Step 5.
On successful completion of theme changing blogger will display message as shown below..


Recommended Post